 Save
Save Last spring, my neighbor asked if I could bake something for her daughter's graduation party, and I realized I'd never made a proper sheet cake before. I stood in the kitchen early that morning, butter softening on the counter, and thought about how a simple vanilla cake could somehow become the centerpiece of someone's celebration. There's something almost magical about turning flour and eggs into something that will sit center stage at a party, waiting to be sliced and shared. That's when I decided: this cake needed to be foolproof, moist, and beautiful enough that anyone could pipe a class year on top and feel like a pastry chef.
I'll never forget frosting that first cake and realizing I'd piped "Class of 2025" instead of "2026"—my hands froze for a second before I laughed at myself and just added a small decorative swoosh to cover the mistake. The cake went to the party anyway, and three people asked for the recipe. That's when I knew this wasn't just a cake; it was something I'd make again and again, each time a little more confident.
Ingredients
- All-purpose flour: Two and a half cups gives you structure without making the cake dense—the key to that tender crumb that melts a little on your tongue.
- Baking powder: Two and a half teaspoons is the right lift for this ratio; too much and the cake rises then falls, too little and you get a sad hockey puck.
- Unsalted butter: One cup for the batter plus another cup for frosting—always soften it properly or your mixing will take twice as long and won't incorporate air the way it should.
- Granulated sugar: One and three-quarter cups dissolves into the batter and creates that tender crumb while the eggs do the lifting work.
- Eggs: Four large eggs at room temperature is non-negotiable; cold eggs won't emulsify properly and the batter will break.
- Vanilla extract: One tablespoon in the cake plus two teaspoons in the frosting—vanilla is the backbone here, so don't skimp on quality.
- Whole milk: One cup at room temperature keeps the batter hydrated without thinning it out, and it alternates with flour to create an even crumb.
- Powdered sugar: Four cups sifted for the frosting; sifting matters because lumps will show when you pipe, and no one wants that.
- Food coloring: A few drops of school colors transform a plain cake into a celebration—use gel coloring if you have it because liquid can make frosting watery.
Tired of Takeout? 🥡
Get 10 meals you can make faster than delivery arrives. Seriously.
One email. No spam. Unsubscribe anytime.
Instructions
- Set up your stage:
- Preheat the oven to 350°F and grease that 9x13-inch pan like you mean it, then line it with parchment paper—this step saves you from cake chunks stuck to the edges. Trust me on this one.
- Dry ingredients together:
- Whisk two and a half cups flour with two and a half teaspoons baking powder and a half teaspoon salt in a medium bowl, breaking up any little lumps as you go. This distributes the leavening evenly so your cake rises like it should.
- Cream butter and sugar:
- In a large bowl, beat the softened butter and sugar for about three minutes until it looks pale and fluffy—this is where you're trapping air that will make the cake light. You'll notice it goes from grainy to almost mousse-like, and that's exactly right.
- Add eggs one by one:
- Drop in each egg, beating well after each addition before you add the next—this takes patience but it matters because each egg needs to fully incorporate and add its binding power. If the mixture looks a little separated at any point, don't panic; it comes back together.
- Mix in vanilla:
- Stir in one tablespoon of vanilla extract and let it blend in completely, maybe thirty seconds of mixing.
- Alternate flour and milk:
- This is the meditative part where you add flour, then milk, then flour again in thirds, beginning and ending with flour—each addition gets stirred just until you don't see dry bits anymore. Over-mixing here is the enemy because it develops gluten and makes the cake tough instead of tender.
- Transfer and smooth:
- Pour the batter into your prepared pan and use a rubber spatula to smooth the top so it bakes evenly. Take your time here; an even surface means even baking.
- Bake until golden:
- Bake for thirty to thirty-five minutes until a toothpick inserted in the center comes out clean or with just a few moist crumbs clinging to it. The kitchen will smell incredible, and you'll be tempted to peek, but try to resist.
- Cool completely:
- Let the cake cool right in the pan on a wire rack for at least an hour—rushing this step means your frosting will melt into the warm cake and slide around.
- Prepare the frosting:
- Beat one cup softened butter until it's creamy, then gradually add four cups sifted powdered sugar, one-quarter cup milk, two teaspoons vanilla, and a pinch of salt. Beat for three to five minutes until it's light and fluffy enough to hold peaks when you lift the beaters.
- Tint if desired:
- If you're using school colors, divide the frosting and add a few drops of gel coloring to each portion, stirring until the color is even. Gel is better than liquid because it won't thin out the frosting.
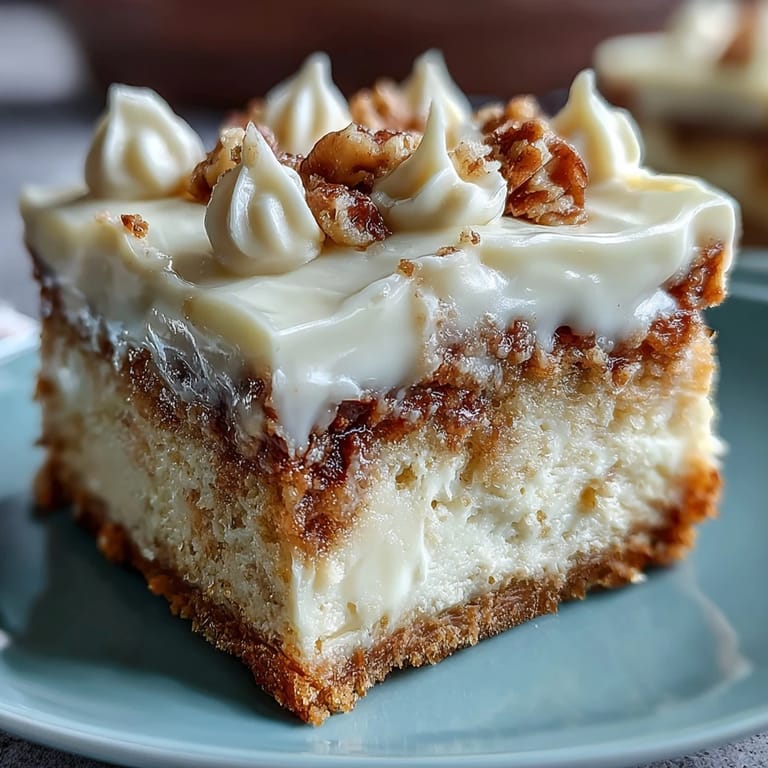
- Frost the cake:
- Spread an even layer of buttercream over the cooled cake using a spatula—don't worry about it being perfect because the piping will hide any imperfections. This base layer is your canvas.
- Pipe the celebration:
- Fill a piping bag fitted with a small round tip with colored frosting, then pipe "Class of 2026" across the top in letters that don't need to be perfect—they just need to be there. If you mess up, you can smooth it out and try again.
- Add the finishing touch:
- Scatter sprinkles or edible decorations around the piped text if you want, but honestly, the piping alone is plenty.
 Save
Save At the graduation party that day, I watched the mom slice this cake and people actually cheered—not because it was fancy, but because it was genuinely delicious and felt celebratory without trying too hard. That's when I understood that sometimes the best recipes are the ones that do exactly what they're supposed to do, perfectly.
Why This Cake Wins for Celebrations
Sheet cakes have gotten a bad reputation because so many are dry and flavorless, but this one is different because of how the milk and butter work together to keep everything moist and tender. The vanilla extract is generous enough to remind you that good ingredients actually make a difference, and the frosting-to-cake ratio feels balanced instead of excessive. I've brought this cake to five different celebrations now, and it's held up in car rides, sat at room temperature for hours without drying out, and genuinely impressed people who don't expect much from a sheet cake.
The Secret to Piping Like You Mean It
Piping the class year feels intimidating until you realize that frosting is forgiving and your imperfect letters are part of the charm—no one expects a home baker to pipe like a pastry shop. The small round tip is your friend because it lets you write in a size that's actually readable, and you can always go back and thicken letters or add dots if something looks thin. I've learned to write the year before I frost the cake, just to get a feel for the spacing on the actual surface, which sounds silly but genuinely helps.
Storage and Make-Ahead Magic
This cake is actually better the next day because the frosting sets and the cake stays moist, which is why I always try to bake it a day early when I'm hosting or attending a party. You can frost it the morning of the event and add the piping a few hours before serving, which breaks the project into manageable pieces instead of one big baking marathon.
- Keep the unfrosted cake covered at room temperature for up to two days, or store it in an airtight container in the refrigerator for up to five days.
- Frosted cake keeps at room temperature for about two days if your kitchen isn't too warm, or refrigerated for up to five days.
- You can freeze the unfrosted cake layers wrapped tightly for up to three months, then thaw, frost, and decorate whenever you need it.
 Save
Save Make this cake and own it—whether it's your first time piping or your tenth. It will taste delicious and look celebratory, and that's all anyone really wants at a graduation party anyway.
Recipe FAQs
- → How do I achieve a moist texture in this sheet cake?
Using room temperature ingredients like butter, eggs, and milk helps create a smooth batter that bakes into a moist cake. Alternating dry ingredients with milk also maintains moisture.
- → What is the best way to pipe the Class of 2026 decoration?
Use a piping bag fitted with a small round tip. Tint portions of the buttercream with desired colors and pipe gently to create clean, precise lettering.
- → Can I customize the buttercream color?
Yes, add food coloring to portions of the buttercream to match your preferred theme or school colors before piping or spreading it over the cake.
- → What are suitable storage methods for this cake?
Store covered at room temperature for up to 2 days. For longer freshness, refrigerate for up to 5 days, keeping it well wrapped to retain moisture.
- → Are there alternatives for dairy in this cake and frosting?
Non-dairy milk substitutes can be used in both batter and buttercream. Ensure all replacements maintain similar consistency and support dietary needs.